Thursday, December 27, 2012

Snickerdoodle Cupcakes

Merry Christmas Everyone!

I have been decorating and baking away this year thanks to no more 12 hour shifts!!  I am pleased to announce that our tree is NC State themed!  (GO WOLFPACK) and so are our presents...I may have gone overboard, but its Christmas, so I am allowed :)

I have baked several batches of yummy Christmas Funfetti cookies using the Pillsbury box recipe and my new festive cookie cutters, but the BEST cookies by far, I baked to garnish a new cupcake recipe.  I had never made Snickerdoodles before, and I don't think I had had them very often, but they are now my (and Hubby's) FAVORITE!!


I did use Pinterest to compile several aspects of recipes from other Bloggers to make these.  They are as follows:  cookies, brown sugar cinnamon frosting, cinnamon sugar cupcake batter

PS: the cake batter is a semi-homemade recipe, but its incredible

For convenience I will write my recipe here so you don't have to jump around on different pages and tabs to bake these delicious beauties.  Give them a try, you and all of the friends you share them with, will NOT regret it :)


Snickerdoodle Cupcakes

For the Batter (adapted from the above listed)
1 White Cake Box Mix
3 eggs
1 stick of (real) butter melted *I use unsalted*
3 tsp vanilla extract
1/2 c buttermilk
1/2 c water
1 tbsp cinnamon

Optional Topping:
2 tbsp melted butter
1 tbsp sugar
1/2 tsp cinnamon


Mix all ingredients well in a large bowl.  Preheat oven to 350 degrees.  Line two cupcake pans with papers.  Using an ice cream scooper (like this) fill each cup with about 1/2 a scoop of batter.  It should make 24 if you really portion them correctly, but I have had times where I only got between 20-22 so don't worry...They will RISE significantly in the oven, you shouldn't have any that were filled about 1/3 of the way to not rise above the paper.

On the first batch of these I made, I brushed the tops with melted butter and dipped them in a mixture of cinnamon & sugar.  This is optional, but its a delicious option :)


For the Frosting
1 stick of (real) butter
1/4 c light brown sugar
1/2 tsp cinnamon
1 tsp vanilla
4-5 c powdered sugar
2 tbsp-4 tbsp milk or half & half

Mix first 4 ingredients well until fluffy.  Add sugar a little bit at a time and mix until combined.  Add milk to thin out enough to pipe.

For the Cookies
1 c butter, softened

1 1/2 c sugar

2 eggs

3 c flour

2 tsp cream of tartar

1 tsp baking soda

2 tsp baking powder

1/8 tsp salt

Cinnamon Sugar Coating:

3 tbsp sugar

1 1/2 tsp cinnamon

Cream the butter and sugar for at least 3 minutes until fluffy.  Use a paddle attachment on your stand mixer.  Add eggs and cream another 2-3 minutes.  This is an important step to make sure the cookie are chewy and light once they are baked.

Combine the rest of the dry ingredients (not cinnamon & sugar).  Add to butter mixture slowly until combined.  Mix together cinnamon & sugar in a bowl.  Make small balls (about 1tbsp full) and roll in the cinnamon & sugar mix.

Bake on a greased/parchment lined cookie sheet at 375 degrees for 7-8 minutes.  They won't look done, but take them out when the tops begin to crack and set out on the cookie sheets until they settle.

To build the cupcakes, pipe the frosting onto the top of the cooled cupcakes and top with a snickerdoodle cookie.  (you will have a ton of leftover cookies...you're welcome :) )


Friday, November 16, 2012

Maple Bacon Cupcakes

Well folks, I have successfully created a man's favorite desert...a cupcake with BACON in it!!

At first you might be thinking, "gross!" but if you're like me, you LOVE breakfast, and if you're like me, you LOVE bacon and pancakes, and the best part of bacon and pancakes is that the yummy sweet syrup gets all over the salty savory bacon and it is a flavor profile so delicious and complex it is hard to match!

I have put it into a cupcake...try these, they are phenomenal :)


Maple Bacon Cupcakes with Maple Bacon Buttercream

12-14 strips of center cut bacon 
For the cupcakes:
1/2 cup butter softened
3 eggs
2 cups All Purpose Flour
1 tsp baking powder
1/2 tsp salt
1/4 tsp baking soda
1 cup buttermilk
1 1/2 cups sugar
1 tsp vanilla
1/2 tsp maple flavoring

For the Frosting:
4 tbsp butter, softened
6 oz cream cheese at room temperature
4 cups confectioner's sugar
1/4 tsp vanilla
1/4 cup maple syrup

Pan fry all of the bacon and reserve the drippings.  Preheat oven to 350 degrees.  Line cupcake pan with liners.

Combine flour, baking powder, baking soda, and salt. In a separate bowl, beat the butter for 30 seconds until fully and add the sugar.  Add eggs one at a time and combine.  Add vanilla flavoring and maple flavoring.  Alternatively, add some of the flour mixture, mix, then add some of the butter milk and mix. 
Add half of the drippings from the bacon.  Continue until all of the ingredients are combined.  Fill cupcake liners 2/3 of the way full.  Bake for 15-18 minutes.

Count how many cupcakes your batter came out to be.  Mine usually falls somewhere between 20-24.  Divide your number by 3 and thats how many bacon strips you should reserve.  Chop all of the rest of them very finely!  The strips you reserved should be cut into thirds to use as garnishes for the frosted cupcakes.

For the frosting, combine the butter, cream cheese, maple syrup, vanilla and powdered sugar.  I usually pour the sugar in a little at the time so as not to become covered in it :)  Add in the rest of the bacon drippings and finely chopped bacon and combine.  Pipe onto completely cooled cupcakes.  Enjoy!!


Thursday, September 27, 2012

Long Week

Friends,
It has been a tough week.  I was sick Monday, mostly due to my lack of sustenance before & after my first day of 30 Day Shred with Jillian Michaels.  I couldn't stand up without feeling like I was gonna hurl, and feeling like that makes me not want to eat, which makes it worse, which meant that I called in sick, went back to bed and slept for 4 more hours...

In retrospect it was kind of sad that I had that much trouble after a 20 minute workout...but I got up the next day and did it again, this time with some Trop50 (lower calorie orange juice) thanks to Hubby and I didn't have any problems :)

Stig Before our walk
Stig After our walk...passed out lol


Monday, after Jillian almost killed me, I had class and a paper due, which I had struggled with.  It was probably the most difficult assignment I have ever had in school.  I am taking Ethical Problems in the Law, a philosophy class, and I chose, on purpose folks, to give myself extra work and take the Honors option, which means 4 additional papers to write on top of the regular classwork.  The first paper....didn't quite go as planned, and the second...well I asked for more help along the way, which just held a mirror up for me showing me how inept I am at analyzing and breaking down a philosophical essay.  I am disappointed at myself, but I am going to make it.  My second paper was due Monday, and I knew it wasn't up to par with what my professor wanted, but I turned it in anyway.  She could tell I was disappointed with it, so she gave me until tomorrow (Friday) to re-write and email it to her.  I am trying to muster through, but its a tough paper...I can usually figure out how to get through just about any type of writing assignment but this type of gleaning of information and extrapolation is really difficult.

Wednesday, and Thursday (today) I worked extra hours at my wonderfully flexible law office to make up the time I missed from Jillian Michaels induced nausea on Monday, so I worked from 9:30-5 both days, leaving less time for other things (PS. I used to work 12 hours shifts...which often turned into 14-18 hour shifts...so I am no stranger to hard work, I am just used to working my little part time job right now :) )

Friday, our Community Group(CG...bible study group of amazing friends) is putting on a cookout for the neighborhood in which three of the families in our group live.  We are doing it up big with burgers, hot dogs, sides, games, and drinks.  We are really hoping that we can show Jesus to the neighborhood and love some people.  I am stoked...getting to make cupcakes, pasta salad, and grilled zucchini & squash.

I stepped out of my office for a few minutes a couple weeks ago, and I came back to find these from Hubby
Saturday, Hubby and I got (cheap groupon) tickets to go see the Carolina Ballet.  He is such a great date :)  He always comes up with fun and enriching things for us to do together.  We go to the Art Museum, Go Karting, out to new restaurants...Hubby is always coming up with fun things for us to do together.  We are also going out to dinner beforehand with our friends Josh and Ashley.  Cant wait, but I'll be so glad when Sunday comes and I can take a BIG breath and relax...

Thursday, September 20, 2012

Well That's Embarrassing...

Last night Hubby and I were talking about how much we have both changed our eating habits over the past few months.  It really has been a complete turn-around for me...when I was still working as a police officer I had crazy hours (6AM-6PM) for about 4 days a week and I couldn't count on my scheduled days off because we were having to pull a lot of overtime.  I used that as an excuse to quit playing in my kitchen, as I so love to do...

Hubby and I joked that we were going to calculate a "typical day" of eating into My Fitness Pal to see just how many calories we used to eat daily without even thinking...I did

it
is
so
morbidly
embarrassing

BUT
I will share this with the world, because I never want to eat like this (regularly) again!  Indulgences have their place and I definitely want the freedom to splurge on a sweet treat or a big restaurant meal sometimes, however, this type of eating would have eventually killed me...which is scary.  

I didn't eat this badly on days I wasn't working, but seeing as I worked about 18 out of every 30 days, it was still pretty detrimental.

Here is a screen shot and calorie count for my breakfast, lunch, and dinner, and dessert
YES YES I ate donuts as cop...don't hate ;)
Donuts are delicious...

ugh...I feel so bad for ever having done this to my body...I have made a change though...and as of this morning, lost another 1.5 lbs...yay!  Not to mention, I was subpoenaed to testify for an old arrest I made in a case from my police days, and I was able to wear a skirt & suit jacket that hasn't fit for a year...NSV! (for those who don't know, that means Non Scale Victory...I had to Google to decode most of what people post on my fitness pal message boards lol)

Wednesday, September 19, 2012

Hubby Said...

So apparently, I haven't blogged in about a month.

My husband is going to lose his mind over it, so here I am :)
(I know you're reading, so loooove you hubby ;) )

I have been feverishly reading Can You Stay For Dinner?  It is a blog written by the gloriously eloquent and hilarious Andie Mitchell, who lost 135lbs and has kept it off for about 5 years.  She has been inspiring with her recipes and memoirs about weight loss and maintenance as well as her humor and zest for life.  It has been a joy to get to know her through her blog and I have almost read it all the way to the beginning.

On that note, my own journey with weight loss has been quite the slow moving roller coaster, if you will.  In all my years of being the chubby girl, I have never lost a significant amount of weight...probably because I have never lived with much sense of moderation in my eating either.  I can remember one summer during high school, between my freshman and sophomore year when I lost some weight because I was working from 7:30 AM until 10 PM most days and eating only one (fried/takeout) meal a day.  I was about to start school and my second season of cheerleading with Manteo High School's JV squad.  It had been my dream since middle school to don that pleated black and gold skirt and I made the squad for the first time for basketball season in 2001.  I couldn't be happier, but I became painfully aware of how different I was than all of the other girls on the squad with me.  I wasn't "popular," not that I was a total loser in school, but I knew I wasn't going to be best friends with the girls I cheered with...high school just doesn't work like Clueless folks, lets be honest.

 epic bangs...and silver eyeshadow

Not only was I not as cool as the other girls, I was definitely not as thin.  Looking back, I wish I could have that body again, because now it would be an improvement, but then, I was just as uncomfortable in my skin as I am now.  I wonder if it will ever get better?  Anyway, coming back for Football season, I was feeling a little better about things sans-15lbs, but I was nowhere close to where I should have been to "fit in" among the 100lb chicks.

Today, 5lbs less than I was a few weeks ago, I am on my way.  Slowly, surely, but mostly slowly...my goal is approaching.  I have a long way to go, but I want to do the things that Andie Mitchell has done.  Find my perfect weight, and keep it, forever hopefully.  My Fitness Pal has been a great help... the mobile app along with the website make it easy to log foods and keep myself accountable for the amount of calories I eat daily.  Like I said, I have never lived with any sense of moderation to my eating.  I ate what I wanted when I wanted to eat it and mostly when I wasn't hungry.  Now though, I am monitoring my eating with success, so far.

I had the same issues that Andie talks about in her blog, in that I ate to feel good instead of for sustenance alone.  If I was sad, or lonely (which was a lot, as an only child with two working parents), or happy, or bored, I ate something yummy, which rarely manifested itself as a veggie or a salad.  Chocolate was my sister and pizza was my brother growing up.  They stuck with me (mostly around the middle) all the way through college and into my 20's, but now, I am done.*  I have begun my transition into a healthier relationship with food, where it provides me with energy and I eat only when I am hungry, not when I feel some (in)significant emotion.

*not with pizza and chocolate completely...everything in moderation :)

I am hoping that in a years time (or less?), I can blog embarrassing before photos and empowering after photos and I will be happy and comfortable with my body...for the first time since I was 5 years old, I will be thin, or at least able to classify myself with the "normal" people.  Thanks for reading (Hubby).

cute 5 year old me...last skinny year I had lol

Saturday, August 25, 2012

Fancy Dinner: Salmon Wellington, Beef Wellington, and Fruit Tarts

Tonight (Saturday) Hubby and I had my Aunt Randi and Uncle Scott over for dinner and I decided I wanted to be a lil' gourmet chef :) The menu was Beef Wellington (for the men...Uncle Scott doesn't like salmon much) and Salmon Wellington (for my aunt and me), garlic grilled asparagus, and garlic redskin mashed potatoes.  For desert I made cookie fruit tarts.
 PS. I also used my fine china to add some class ;)


I have made the tarts, potatoes, and asparagus before but the main dishes, the Wellingtons, were both new to me, so it was an interesting day.  I also decided to try something new with my tarts and both the Wellingtons and the desert turned out awesome so I thought I would share what I did.

I loosely followed these two recipes for the Wellingtons: salmon and beef
for the tarts I got the idea from this post on Pinterest, but I made my own recipe that doesn't waste a whole container of limeade concentrate.  Here are my takes on these recipes.  Enjoy!

Salmon Wellington

2 pieces of Sockeye Salmon
1 sheet of thawed Puff Pastry
2 Tbsp (about) of Sun Dried Tomatoes
Fresh Spinach (about two handfulls)
minced garlic
Extra Virgin Olive Oil
Alfredo Sauce
Egg*

Saute the spinach with the garlic in the olive oil over medium heat until the spinach is wilted and tender.  Set aside and let it cool for at least 20 minutes

Using a VERY sharp knife, filet the salmon skin off of the meat.  

Unroll the puff pastry sheet and roll it out with a rolling pin.  Slice it in half lengthwise.  Place a salmon filet onto a half of puff pastry and put sun dried tomatoes on top.  Add half of the spinach mixture to that and wrap the whole thing up.  Place in a greased baking dish, seem side down.  Slice a slit or an X into the puff pastry to let out some steam while the fish is cooking.

*I forgot to do this, but for a golden brown crust, it is ideal to remember it :)  beat the egg with water to make an eggwash and brush the puff pastry with eggwash.


Bake at 375 degrees for about 20-30 minutes until the puff pastry is flaky and golden.

Serve with Alfredo Sauce on top.

I baked the beef in a separate dish at the same time and temperature.

Beef Wellington

2 8oz packages of Baby Bella mushrooms
3 tbsp of Spicy Brown Mustard
2 tbsp of Garlic Herb Kraft Mayo*
2 packaged Bacon Wrapped Filet Mignons
1 sheet of Puff Pastry
1 Egg 

FINELY mince the mushrooms with either a "slap chop" type of slicer or a food processor until it is almost like a paste.  Put them in a HOT pan and saute until the water/moisture boils out, but not until they burn.  Set the mushroom paste aside.

Sear the steaks on each side (I did it for about 1 min on each side).  Mix together the mustard and mayo.  Once the steaks are seared, brush them on all sides with the mustard mix.  On two pieces of plastic wrap, put about 1/3 of the mushroom paste on each.  Put the steak down on top of the mix and put the remaining mushroom paste on the other side of the steaks.  Wrap each steak tightly and place in the refrigerator.

Roll out the puff pastry with a rolling pin and cut in half lengthwise.  Take the steaks out and put one on each half of pastry and wrap it.  Place the meat seam side down in a greased baking dish.  Cut a slit into the top of the pastry

Beat the egg with water to make an eggwash and brush the top of each Wellington.  Bake for 20-30 minutes at 375 degrees or until the pastry is flaky and golden.

Fruit Tarts

1 package (24 ct) refrigerated Sugar Cookie Dough
8 oz Cream Cheese
4 tbsp (about) of Lime Juice
3 heaping spoon-fulls of Confectioner's Sugar
Sliced Fresh Fruit (I used what was ripe/on sale: peaches, strawberries, blueberries, & kiwi)

Preheat the oven according to the package directions on your cookie dough.  I used a mini muffin pan and turned it upside down.  I pressed each cookie over the bottom of each cup so that when the cookies baked, they would make tiny bowls.  I baked them according to the package directions and they came out like this:

I let the cookies cool completely on the pan, then I carefully cut the cups apart and removed them from the pan, a couple broke, but there were only four of us needing to eat, so I knew we would still have plenty.


I let the cream cheese come to room temperature and whipped it with a hand mixer.  Then I added some lime juice and some sugar, mixed it again, then added more, tasting after each addition, until the cream cheese tasted tart, yet sweet.  The measurements in the ingredients are approximations, it is hard to mess this part up :)

I washed and sliced (except the blueberries) my fruit and got it ready to go in the cups.  I spooned a little of the cream cheese mixture into the cups and filled them with a slice each of peach, strawberry, and kiwi, and then two blueberries.  They came out beautifully :)


On another note,
My hubby has been using MyFitnessPal to track his calorie intake and exercise for the past several months.  Since January he has lost about 30 lbs.  He has told me probably a hundred times how cool the app is and how easy it is to use, but I never remembered to download it.  Well last time we were visiting his hometown, my sister and brother in law said they use it too and they can all "add" each other as friends and share food diaries to keep each other accountable.  I thought that was kind of neat, but then they said you can scan the bar code with your phone on most any food and it automatically comes up with the nutrition facts...WHAT that is so cool...technology is awesome.  SO I finally downloaded the app and I'm loving it.

I cleaned the downstairs of our house today for about 2 hours and according to my app, burned like 498 calories!  Not to mention, I have decided to get back into the habit of logging what I eat, even if its not all good stuff like the a fore mentioned delicious gourmet meal I made today :)  I had a sensible breakfast and lunch today though, so I am still under my calorie limit for the day.


Saturday, August 18, 2012

S'mores Cupcakes

Hubby and I went to his parents house to visit this weekend.  We had a family dinner with his sister and brother in law and their two sweet children.  I baked these awesome cupcakes for our dessert.


I used the cake recipe from this blog and the icing recipe from this blog.  For the filling I made some heavy chocolate ganache.

Here is the recipe:

S'mores Cupcakes 

makes 24 cupcakes
 
1 box of white cake
1/2 cup (one stick) of melted butter
1/2 cup of milk*
1/2 cup of water
3 eggs
1 tablespoon of cinnamon
3 tsp of vanilla

Preheat the oven to 350.  Combine all ingredients with a mixer until well combined.  Spoon into a lined cupcake pan and bake for 13-15 minutes.
 Let the cupcakes cool completely.
*the fat content of your milk doesn't seem to matter, I have used several different milks (skim, 1%, whole...etc) and they all worked fine


Chocolate Filling

1 cup of heavy cream
1 to 1.5 cups of semi-sweet chocolate chips
2 bars of Hershey's chocolate

Heat the cream in the microwave for 1 min and 30 seconds.  Add in the chocolate and stir.  Once the chocolate is melted and mixture is smooth, put in the freezer for about 5 minutes or so to thicken it up.

Marshmallow Buttercream

1 cup (two sticks) of butter at room temp
1 7oz jar of marshmallow fluff
2 cups of confectioners sugar
1 tsp vanilla

Cream the butter, then add the fluff.  Whip until combined (2 minutes).  Add in the sugar and whip again for a few minutes until well mixed.  Add the vanilla and mix for one minute more.

For a garnish I used 2 graham crackers, broken into 24 pieces and two bars of Hershey's.  

To assemble, I cute a well into the cupcakes and filled it with the chocolate ganache.  Then I piped the frosting on using a star tip.  I then placed a chocolate square and a piece of graham cracker.

Here is another picture of the finished product :)

Friday, August 17, 2012

Update and Steak & Mashed Taters Cake


Hello world,
A lot has happened in the month or so since I blogged last.  Here goes...

I got a JOB at an awesome law firm in downtown Raleigh where I am a legal assistant.  This was SUCH a blessing from God because now I am both bringing in some income and gaining invaluable experience that will help me in my future career.  I have been working here for two and a half weeks now and I absolutely adore it.  I look forward to learning more as time passes.

Also, I have signed up for two classes this fall at my Alma Mater, NCSU (GO PACK).  I am taking some extra classes to beef up my transcript in the hopes that a law school who is considering me for admission can see that I have more academic potential than I showed during my undergraduate degree pursuit.  I am taking a Political Science class, Problems in American Democracy, and a Philosophy class, Ethical Problems in the Law.  I hope they go well and that I can pull off two more A's :)

My Lovely and Beautiful cousin Michelle is getting married in September so I have been doing some fun things to get ready for her wedding in the past month as well.  I blogged the making of her bachelorette invitations and everyone totally loved them.  Her bachelorette went off without a hitch (except some guy tried to accost me outside of the bar we went to in downtown Richmond at 3 AM...of all of the girls I was with, he chose the former police officer and current RAD (Rape Aggression Defense) instructor...bad move pal, he came very close to being badly injured, but he let go after we had a "come to Jesus" meeting).  The next weekend I went to Richmond again for Michelle's bridal shower and we had a blast.  The food was great and my mom and aunt did a wonderful job decorating and planning cute games.  Michelle loved it!

My husband and I also went to and two awesome weddings.  Our friends Laura and Seth got married and are huge comic book nuts, specifically, Batman, Nightwing, and Batgirl.  They had a Batman Themed wedding and a unique reception.  Both their bridal party and groom's party were comprised of girls and guys which was really neat.  They wore batman-like masks and stood at the altar of the church in the shape of the Nightwing symbol.  Their reception was like a carnival at a farm with inflatable jump houses, tons of toys/candy decorations, and fair food.  It was a blast.  It rained shortly after the bride and groom arrived but that didn't phase them, in fact a rainbow touched down in the field next to us so we all got to see the end of a rainbow...no pot of gold, but it was still neat :)

The second wedding was that of our friends Sarah and Matt.  They had a lovely church wedding with one of the most fun receptions we have ever been to.  The food was amazing and the decor was beautiful.  The colors were shades of purple and Sarah had decorated with purple gingham and made an indoor picnic with mason jars filled with wildflowers.  They had yummy pulled pork and grilled chicken with green beans and potato salad.  Everything was served family style in antique bowls.  They had a HUGE amount of guests and after we ate we all danced the night away while one of Sarah and my husband Jordan's college friends James DJ'ed.  It was a blast and they sped off in Matt's white Corvette at the end of the night to enjoy their honeymoon. 


The last bit of news is that my friend John had a surprise birthday party thrown by his lovely fiance Meredith.  Knowing that I am and avid baker, she asked me to make his cake and had an unusual request...Apparently for their wedding John had asked for a steak cake as his grooms cake, but being the ultra classy southern belle that Meredith is, she had to decline because their wedding is going to be the epitome of Southern Charm and Beauty...it just didn't fit into the theme.

Meredith said that they would have about 12-15 guests over for the surprise party and so I suggested making cupcakes to go with the cake.  I had a great idea to make mashed potato cupcakes because what man doesn't love steak & taters?  I know my hubby does :)  I saw Paula Deen make TV dinner themed cupcakes on her show once, and I knew it was the perfect accent to the steak.

Here is what the cake and cupcakes looked like displayed.  Apologies for the grainy pics, the lighting was not great.
 For the cake, I used a scratch red velvet cake recipe found here so that when we cut into it, the cake looked like a perfectly cooked steakInstead of baking cupcakes according to the directions though, I just poured the batter into a well greased pyrex rectangular dish and baked until it was done.  After the cake was done and fully cooled, I cut the cake into the shape of a steak and plated it onto a large platter.

Next, I whipped up this amazing homemade chocolate buttercream.  I iced the cake liberally.  Next I made the cupcakes.

I wanted to do something fun and different for the cake flavor so I decided instead of simple white cake, I would do Almond Cake.  Here is the recipe:

Almond Cupcakes

Ingredients 
1/2 cup butter 
4 egg whites 
2 cups all-purpose flour 
1 teaspoon baking powder 
1/2 teaspoon salt 
1/4 teaspoon baking soda 
1 cup buttermilk 
1 1/2 cups sugar 
1 teaspoon vanilla 
1/2 teaspoon almond extract


1. Allow butter and egg whites to stand at room temperature for 30 minutes. Meanwhile, line 20-24 muffin cups with paper bake cups (or coat with cooking spray). Stir together flour, baking powder, salt, and baking soda.
2. Preheat oven to 350 degrees F. In a large mixing bowl beat butter with an electric mixer on medium to high speed for 30 seconds. Add sugar, vanilla, and almond extract; beat until combined. Add egg whites, one at a time, beating well after each addition. Alternately add flour mixture and buttermilk to beaten mixture, beating on low speed after each addition just until combined.
3. Spoon batter into prepared muffin cups, filling each about two-thirds full.
4. Bake for 15 to 18 minutes or until tops spring back when lightly touched. Cool cupcakes in muffin cups on wire racks for 5 minutes. Remove cupcakes from muffin cups. Cool completely on wire racks.
5. Frost using a round tip like the one pictured here.  I used my cream cheese butter cream for the icing.
 6. I then made a small well in the top of the cupcakes and drizzled caramel in the wells making it look like gravy.  To top it off I used unwrapped lemon Starburst candies to make pats of "butter"


 Next, I used some of the leftover cream cheese butter cream and piped it in the shape of a T-bone onto the steak. Finally, I melted some chocolate chips I had in the pantry to make the "grill marks" on the steak.  I put the melted chocolate in a small sandwich bag and snipped a tiny piece off of the corner.  Using this, I piped the "grill marks" onto the cake.  Because the chocolate chips didn't have any cream or liquid added, I knew it would harden back up and keep the lines clean.  I refrigerated the steak cake uncovered for about 30 minutes to make sure the chocolate and the buttercream had set so the would not get ruined by plastic covering.  I placed the cupcakes in a large foil pan and covered them (since my cupcake carrier was full).

Here are some brighter pictures of the finished product!


Thursday, July 19, 2012

Bachelorette Invitations!!

So it has been a while since I have blogged...a lot has happened :)  My husband and I went to a wedding and I baked one of the cakes.  It was a pink lemonade cake and it was DELICIOUS.  I'll blog the recipe someday :)  The wedding was so beautiful.  It was outside in the mountains of NC on a family farm.  There were sunflowers growing in the background of the ceremony and we sat on hay bails...it was so cute.

We also went to Smith Mountain Lake and then to the mountains of Northern Virginia for my maternal side's family reunion. We tent camped and enjoyed the outdoors.  It was a fun four days.

Now to the subject of this post...
My beautiful cousin is getting hitched in September and I made invitations for her bachelorette party based on some things I saw on pinterest.  Here is a tutorial of how I did it.


I needed 18 invitations so here is a list of supplies:

18 pieces of black 8 1/2" x 11" card stock
1 piece of a 8 1/2" x 11" card stock of a contrasting color for template
9 pieces of white 8 1/2" x 11" card stock
9 sheets of silver scrapbook paper (I used 12x12 and cut it down to size)
2 sheets of hot pink 8 1/2" x 11" cardstock
clear stamps (numbers and letters)
silver ink
lace ribbon with pearls
hot pink ribbon (1/4 inch) I used about 1 and a half spools of 10 yrd
scissors
a pencil
a ruler
a hole punch
hot glue gun
glue stick

I started by making a template for the outside paper. I measured 2 and 5/8 of an inch from the left side of the paper (landscape) and made a tic mark for the fold.  I did the same on the right side and folded the paper so that the flaps were the measured width.  I then measured 6 inches from the bottom of the paper and marked each flap on the edge.  This is where I would draw the diagonal for the cutouts to make it look like a corset.

I drew a line using  a ruler and a pencil from the top left corner to the mark on the edge of the left flap and did the same for the right.  I cut out the triangles.  Next, I used the ruler and measured to make the holes that the ribbon would lace through.  If you spend the time on the template, the rest of the actual parts are cake.  The edge of each flap is now 6 inches long so I made a dot with my pencil 1/2 inch up from the bottom and then on each inch until I reached the 5 1/2 mark on my ruler.  I repeated this for the other flap.  Using the hole punch, I punched out where I had made the marks.  The template comes out like this (please excuse my messy craft table...):

 
Make sure you make good creases in the paper.  I use the handle of my scissors to crease my paper.

I laid the template onto the black card stock and marked it to look like this:


Then I folded the paper and cut across the diagonal and punched out holes where I had dotted

Next I set out to make little bustiers to put my cousin's bra and panty size for those who wanted to get her lingerie.  I drew out a template on heavy card stock and traced it 18 times onto the hot pink paper.


To make the template I used a giant glue stick as my top "boob" circles.  I then used the ribbon spool for the sides.  I used the glue stick again for the leg holes.  It was pretty easy once I drew that out.  I then cut out all the little bustiers

Next I stamped on my cousins bra and panty size with clear stamps and silver ink.


I found some super cute lace ribbon at Michaels that had pearls sewn onto it.  I figured I could make half of the bustiers lacy and the other half trimmed in pearls.  I plugged in my hot glue gun while I cut the pearl string off of the ribbon.


I measured the pearl strings and lace to fit on the top of each bustier.  Then I clipped each piece of lace in the middle about 3/4 of the way so it would curve around the bra top.


I hot glued the lace to the back of each bustier and the pearls to the front.  When I finished they looked like this:


I made a really layout for the invitation itself using Microsoft Publisher.  I put two to a page to save paper and printed them on the white card stock.  I then cut them all out along the border.  They were just over 4" x 6 1/2"

I measured and cut the silver card stock to about 5"x7 1/2".  Since I used 12" x12" I was able to get two from each piece.

I glued the silver paper down first, then glued the printed paper on top.  I glued the bustier to the inside flap so that people could see it when they opened the invitation.  Make sure not to cover your holes and leave room for the fold!


Next, I cut the hot pink ribbon into about 28 inch pieces.  I used a lighter to barely melt the ends to keep them from fraying while I laced the invitation.  Then I laced it up and tied it in a bow!


I hope you all can give this a try!  If you're not a crafty person but you still want these for a bachelorette party I would be glad to make them for you.

Here is the finished product again:


Tuesday, July 3, 2012

Happy 4th Everyone!

I love the 4th of July...SO much :)  I love the colors, I love the fireworks, I love coordinating red white and blue outfits and hair ribbons, but most of all I love America and Freedom.  It is a wonderful holiday and I am really excited about it this year.

Hubby and I are going over to our friends' place to grill out, chill at the pool, and relax until fireworks.  I got some turkey brats that are really healthy, whole wheat buns, zucchini, mushrooms, and corn on the cob to throw on the grill.  Jordan and I have been going to the gym twice a day this week: cardio (running) in the AM and weights/circuit training in the evening.  I feel pretty good about it.  However....I got festive this afternoon and decided to make cupcakes...

Its Independence Day, we can have cupcakes right? ;)

Anyway, they are pretty cool.  I changed a semi-homemade cake recipe to make it my own and topped it with delicious cream cheese butter cream.  I used a bunch of different tricks to decorate too.

July 4th Cupcakes*
1 (18.25oz) box of white cake with red & blue sprinkles*
1 cup       All Purpose Flour
1 cup       Granulated Sugar
3/4 tsp    Salt
1 1/3 cup Water 
1 tsp        Vanilla Extract
1 cup       Sour Cream
2 Tbsp Canola Oil (or Vegetable)
4 egg whites

Preheat the oven to 325 degrees.  Line cupcake pans with between 30-36 cupcake papers.  I used blue to go with my red, white, and blue theme.

Whisk together the dry ingredients (first 4).  Then add in the rest and beat for 2 minutes on medium speed until well combined.  Fill the cupcake papers 3/4 of the way.  I got 30 cupcakes exactly.

Bake for 20 minutes.

*this recipe could be altered for any holiday using any combo of sprinkles and a box of plain white cake

Mix up the butter cream icing recipe found here :  my cream cheese butter cream icing

Once the cupcakes are completely cooled, it is time to decorate!
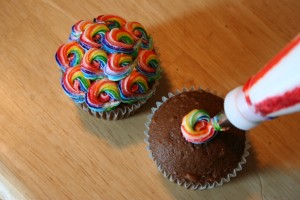
I used this technique with red and blue gel food coloring :  rainbow swirl icing


But it is pretty hard to re-fill the bag and still get the color in the icing, so I only did a few cupcakes with that technique.
For the rest, I used several different decorating tips and some sprinkles I got on sale for $0.99 at the grocery store today.

Here is how they turned out :) Oh and FYI, we ARE going running in the morning so I won't have any qualms about eating one of these babies tomorrow :)